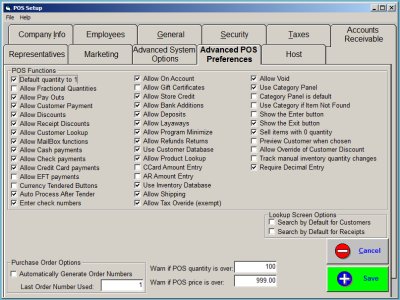
This is the Advanced POS Preferences screen. Listed on this Tab are most POS operating options, which allow you to customize the POS operation to the way you want it to work in your store.
Other related Point Of Sale (POS) settings are set at the General Tab and the Advanced System Options tab.
Please review those topics as well.
![]() The most frequently asked question in this section is ”What happens if I check or uncheck this option?” Please review the extensive listing below for more information
The most frequently asked question in this section is ”What happens if I check or uncheck this option?” Please review the extensive listing below for more information
![]() Long Topic; More Information Below....
Long Topic; More Information Below....
![]()
|
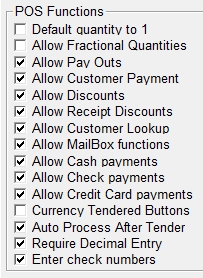
POS Functions:
Default Quantity to 1: Unchecked, you can enter a quantity sold at the Point of Sale. With this option checked, the quantity is assumed to be 1 unit. You can always go back and edit the quantity to a different number prior to completing the sale.
Allow Fractional Quantities: When checked, this allows the entry of a fraction of a unit (i.e. 1.5) in the Quantity field on the POS screen. When unchecked, the program will require whole unit entry in the Quantity field.
Allow Payouts: When checked, this tracks the removal of cash from the cash drawer for business purposes. This feature is used to track incidental expenses instead of keeping a petty cash fund. If unchecked, it removes the Payout button and functionality from the POS screen. Payouts opens the drawer without a sale (No Sale). Unlike No Sale, Payout asks the user to classify the purpose of the transaction (delivery, lunch money, etc.) which is then identified on the Z-Tape.
Allow Customer Payment: When checked, this allows the entry of payment to an On Account customer's account log crediting the payment to the balance. Unchecked, it removes the Account Payment button and function from POS.
Allow Discounts: When this item is checked, it allows Line Discount functions. The Discount function is available by line item only. If unchecked, it removes the Discount button and function from the POS screen.
Allow Receipt Discounts: This item allows a discount on the total of the sale by discounting each line item appropriately. If unchecked, it removes the Discount Receipt function from the Discount form. NOTE: Allow Discounts must be checked to activate this option.
Allow Customer Lookup: This activates the Customer Lookup button on the POS screen, allowing the program to track customer sales activity , and to link a Ship To Address to a customer when the customer is selected prior to a transaction . Unchecked, this removes the Customer Lookup button and function from the POS screen.
Allow Mailbox Functions: This item activates the Mailbox button on the POS screen and allows access to the mailbox program from the Toolbar, Ship/Mail drop down menu, and the Mailbox Manager button on the Shipping screen. If unchecked, this removes the Mailbox button from the POS screen.
Allow Cash Payments: This activates the Cash button on the POS screen as an accepted method of payment in your store. Otherwise, the Cash button does not appear on the POS screen.
Allow Check Payments: This activates the Check button on the POS screen as an accepted method of payment in your store. Otherwise, the Check button does not appear on the POS screen.
Allow Credit Card Payments: This activates the Credit Card button on the POS screen as an accepted method of payment in your store. Otherwise, the Credit Card button does not appear on the POS screen.
Currency Tendered Buttons: When checked, this item activates a dollar and coin graphic for entry of amount tendered. This is designed for use with Touch Screen. When unchecked, a calculator graphic appears for entry of amount tendered from either keyboard, mouse click, or touch screen.
Require Decimal Entry: When checked, the program assumes that for POS entries the amount entered is in dollars. You must type a decimal entry to designate cents. When unchecked, the program defaults the decimal point two numbers from the right of entry.
Enter Check Numbers: When checked, the check number entry prompt is displayed and the check number is listed on the Z-Tape. if unchecked, the check number entry prompt is not displayed and the check number is not listed on the Z-Tape.
|
|
|
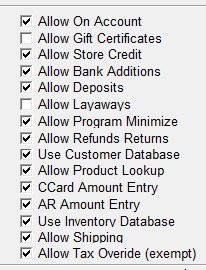
Allow On Account: When checked, activates the On Account button for the processing of sales to in-store AR accounts. Unchecked, this removes the On Account option as a payment form at the POS screen.
Allow Gift Certificates: When checked, this activates the Gift Certificate button as a payment form at the POS screen. If unchecked, this removes the Gift Certificate button as a payment form at the Point Of Sale screen.
Allow Store Credit: When checked, this activates the Store Credits button as a payment form at the POS screen. If unchecked, this removes the Store Credit button as a payment form at the POS screen.
Allow Bank Additions: When checked, this is used to increase the starting drawer amount if money is added but not exchanged with a Cash fund. Otherwise, the system does not allow for increasing the starting drawer amount. Money is exchanged with a Cash fund (i.e. a roll of quarters is added and a $10.00 bill is removed.)
Allow Deposits: When checked, this activates the Deposit button at the POS screen. When unchecked, Removes Deposit button from the POS screen as a form of payment. Default: Allows you to set a default rate expected.
Allow Program Minimize: When checked, this allows the program to minimize when Windows functions are activated by clicking on the appropriate icon in the upper right hand corner or the screen. If unchecked, it will not allow the ReSource program to be minimized by clicking on standard Windows functions in upper right hand corner of the screen. Note It is our recommendation that you leave this box unchecked.
Allow Refunds/Returns: When checked, this activates the Refunds and Returns button at the POS screen giving access to the Refund form. If unchecked, this removes the Refund and Returns button from the POS screen.
Use Customer Database: When checked, this activates the Customer Database button at the POS screen. When unchecked, this removes the Customer Database button from the POS screen. This function can still be accessed via the Menu Bar and clicking on Database.
Allow Product Lookup: When checked, this activates the Product Lookup (Large Black Down Arrow) at the POS screen, which allows you to scroll down to find items on the inventory list. if unchecked, this deactivates the Product Lookup (Large Black Down Arrow) at the POS screen. This will then require a Stock Number, Description or Bar-code entry to select an item from inventory for sale at the POS screen.
CCard Amount Entry: Governs the amount field on the CC form. If CC Amount Entry is unchecked, the CC Amount is locked and cannot be changed on the form. IMPORTANT: Unchecking this option prevents giving change back on credit card sales.
AR Amount Entry: Similar functions to CCard Amount Entry. Prevents giving change back on On Account payments.
Use Inventory Database: When checked, this activates the Inventory Database button on the POS screen. If unchecked, this removes the Inventory Database button from the POS screen. This function can still be accessed by using the Menu Bar and clicking on Databases.
Allow Shipping: When checked, this activates the Shipping button on the POS screen and allows shipping charges to flow to the POS screen as part of the procedure., If unchecked, this removes the Shipping button from the POS screen. You can still access Shipping through the Menu Bar Ship/Mail, but shipping charges will not pass to the POS.
Allow Tax Override (exempt): This activates the Tax Override button at the POS screen. This will allow the Tax Exempt form to be displayed at the time of a sale for exempt information entry. This will require a customer to be setup in Customer Database with a tax-exempt number recorded to receive Tax Exempt status at POS. Entry of tax-exempt number is required receive Tax Exempt status of a sale at POS. If unchecked, this removes the Tax Override button from the POS screen.
|
|
|
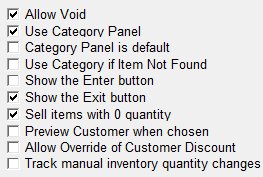
Allow Void: With this option checked, the Void button appears on the POS. Users are allowed to Void an entire transaction. Security can be set on the Void functions as well. With this feature disabled, only Del Line can be used to remove all or part of a transaction from the POS.
Use Category Panel: When Use Category Panel is checked, this activates the Category Panel button on the POS screen. The Category Panel is a button-style selection panel, with a button for each designated sales category. It is the form used to sell items at a sales category reporting level. When unchecked, the Category Panel button is removed from the POS screen. View the Category Panel topic for more information
Category Panel Is Default: With this option checked, when you start a new transaction or finish adding a line, the Category Panel will be displayed automatically. If you wish to lookup an item, you can close the Category Panel and use the program normally for the next item. This option is unchecked by default.
Use Category If Item Not Found: When this item is checked, if a stock number that doesn't exist in inventory is entered at POS , the program cuts off the last number entered, leaving it at the last item that matches your entry. Example: If you have 0700 and 710 and the stock number 0711 is entered, it cuts off the last 1, and leaves 0710 highlighted. If unchecked, when a stock number is entered that is not in inventory, the program will display an ”Item Not Found ” message box.
Show The Enter Button: When checked, this adds the Enter button to the POS screen. Primarily used for touch screen entry. When unchecked, this removes the Enter button from the POS screen. NOTE: This is not available for selection if Show the Exit button is checked.
Show The Exit Button: When checked, this adds the Exit button to the POS screen. This will override the Enter button if Show Enter button is selected. Unchecked, this removes the Exit button from the screen at POS.
Sell Items With 0 Quantity: With this option checked, items with an inventory count less than 1 are still available for sale at the POS, and available for use for other program areas such as the Packaging Estimator. With this option unchecked, these items are not visible for selection from the POS inventory selection list, nor will they be used for Packing.
Preview Customer When Chosen: Preview Customer when selected – If checked upon selection of the customer at POS , it opens this customer record in the database to give you an opportunity to update the record. Clicking the Done button in customer database will return you to the POS screen to continue with the transaction.
Allow Override of Customer Discount: Override customer discount – If an automatic discount is entered for the customer in Customer Database, a popup box with the preset % displayed prior to item selection. You can change the % for this transaction now or if you accept the discount and determine you want to adjust it, you can click on the word Discount in the ”Totals” section to adjust after item selection and prior to payment
Track Manual Inventory Quantity Changes: For customers who do not use the Purchase Orders module for receiving inventory orders, this will allow you to track whenever the quantity on an inventory item has been changed by a user.
|
|
|
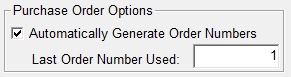
Purchase Order Options
Automatically Generate Order Numbers: When checked, the program will automatically generate the PO number when creating a Purchaser order. If unchecked, the program will not create the PO number.
Last Order Number Used: You can set the order number starting point by changing the ”Last Order Number Used”. The system will add 1 to this number for the next Purchase Order you place. Example: if you enter 1000, the system will use 1001 on the next order.
|
|
|
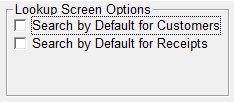
Lookup Screen Options: Search By Default for Customers: When this item is checked, at the Customer Lookup form no customer data will be displayed. This requires clicking the button for the desired search field and minimum entry of 3 characters, followed by clicking on the Search button. Only data matching the criteria for the search will be displayed. If unchecked, then for each customer entered in your customer database, data for the buttoned fields on the Customer Lookup form will be displayed.
Search By Default For Receipts: If checked, at the Receipt Lookup form, no receipt data will be displayed. Requires clicking the button for the desired search field and minimum entry of 3 characters followed by clicking on the Search button. Only data matching the criteria for the search will be displayed. If unchecked, all receipt data for the buttoned fields on the Receipt Lookup form will be displayed.
|
|
|
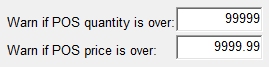
Warnings On Transaction Amounts:
Warn If POS Price Is Over: When this is checked, if the amount entered is greater than $9999.99, the Amount Entry warning box is displayed. If answered "YES", the amount is posted as entered. If answered "NO", the focus will return to the incorrect entry field for you to make your adjustment. When unchecked, the program allows any manual entry with no warning displayed. You can edit this threshold to any level you wish
Warn If POS Quantity Is Over: Similar warning if an excess quantity is entered.
|
|
Return To Configuration Overview
![]()
ReSource Help System - Home Page
![]() Sales: (800) 818-0492
Sales: (800) 818-0492
Customer Service: (800) 537-3621
Email: support@resourcesoftware.com | sales@resourcesoftware.com


Follow us @resourcehelp | Subscribe To ReSource Software YouTube Channel
ReSource Partner Help System. ©1996-2014, ReSource Inc. All rights reserved.
ReSource Inc., 10465 Park Meadows Drive Suite 205, Littleton, CO 80124
Terms Of Use | Legal | About
ReSource Partner, Partner Express, QuickMail, and WebAssist are trade names of ReSource, Inc.
All other trade names mentioned are property of their respective owners.
POS SHP MBX | PK | US
14.2.2 | 14.1.1
 If store policy is to take 50% of total due at time of order and balance at time of pickup for a product or service sold you can define this as a default deposit rate. This can be changed on a per job basis also