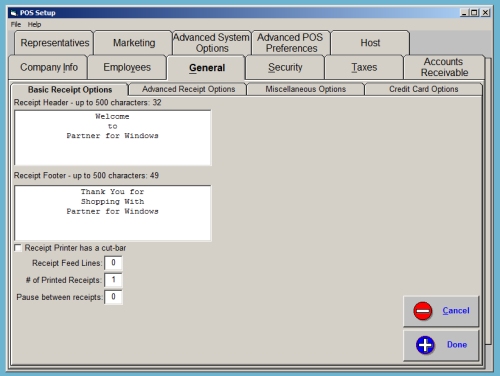
This is the General Tab.
Here a variety of General system preferences are set.
The General Tab is divided into sub-tabs (Basic Receipt, Advanced Receipt, Miscellaneous)
Review the extensive listing below.
Other related Point Of Sale (POS) settings are set at the Advanced System Options Tab and the Advanced POS Preferences tab. Please review those topics as well.
![]() Long Topic; More Information Below....
Long Topic; More Information Below....
![]()
![]()
|
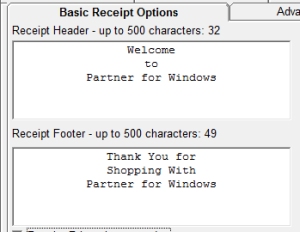
Receipt Header/Footer:
This where the information at the top and bottom of your receipts are set. You can input up to 500 characters in these fields.
These sections can be used for a variety of purposes:
|
|
|
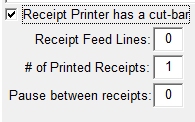
Receipt Printer Has Cut-Bar: For receipt printers that also have a cutter bar feature, you can customize the behavior of the system by preventing the cutter bar from initiating on long receipts such as the Confirmation Receipt and Z-Tape
Receipt Feed Lines: You can set a number of feed lines after the receipt is completed
# of Printed Receipts: If you wish to print multiple copies of the same receipt, set this number to higher than 1
Pause Between Receipts: If you are printing multiple receipts, you can experiment with this number to introduce a delay between receipts. Express in milliseconds. Suggested starting point is 500 |
|
![]() Long Topic; More Information Below....
Long Topic; More Information Below....
![]()
![]()
|
Receipt Options
Receipt Preview: If checked, the receipt will be displayed on screen for review. Though displayed, no changes can be done to the information at this point. If unchecked, the receipt will not be displayed on the screen and will automatically print. If this option is unchecked Receipt preview prints on 'Enter' will not be selectable.
Receipt Preview Prints On Enter: If checked, this will allow you to press the Enter key on the keyboard to print a receipt when previewed. If Receipt Preview is not checked, this option will not be available.
Auto Certificate Number: If checked, the system auto assigns a number to Gift and Store Certificates generated by the program. If unchecked, the system allows the user to enter their certificate number.
Print UPC Scan Code: When checked, if there is a scan code for the product in the scan code field in Inventory, that scan code will print on the receipt when that item is sold. If unchecked, the scan code does not print on the receipt.
Allow Receipt Hold: When checked, this activates the Temporary Hold function and the ability to do Estimates at the POS screen in the program. Temporary Hold allows you to move a sale in progress to the side, process another transaction and have the sale which you set aside return to the POS screen upon completion of the one in process now. If unchecked, when you click on the Hold Receipt Tab at the POS screen, you will get an information box informing you this function has been turned off and where you would need to go in the program to turn the function on.
Allow Estimates: When checked, this puts the Estimate button on the POS screen. When unchecked, it removes the Estimate button and functions from POS. NOTE: Allow Receipt Hold must be checked to use this option
Comment Lines For Notes: When checked, this adds an 80 character note field, which will print at the bottom of the POS receipt for that transaction. If set to do so, the Comment field will also print on the Receipt Invoice and Estimate. If unchecked, the comment prompt will not display.
PO Number: Purchase Order Number - PO Number shows additional information screen that appears on printed receipts and invoices. If you wish, the PO Number will also appear on AR Statements in the comment section, but only if Store Information -> Accounts Receivable -> Printing and E-mailing – AR Statement / Invoice Printing – Comments is checked.
Comment Lines For Receipts: These options to refine how you wish Comments to be printed on the customer's receipts.
Receipt Format: Allows you to specify what type of receipt printing you wish to use - Graphical allows you to print a logo on your receipt. For more information, please review the Graphical Receipt Topic.
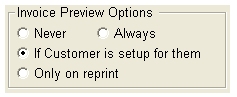
Invoice Preview Options: If Graphical is enabled in the Receipt Format option above, Invoice Preview Options will appear. These enable you to use the combined Receipt/Invoice/Email screen. This is discussed further in the Combined Receipt Printing screen topic
|
|
|
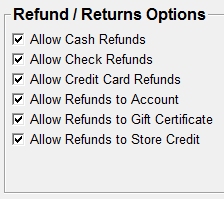
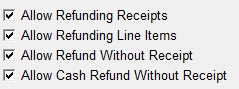
Refund/Returns Options
These options allow you to tailor how you will or will not make a refund.
The second group of options sets the type of refunds allowed. For instance, you may wish to allow refunding individual lines on a receipt, while you may not want to refund in cash for returns without a receipt.
You can mix any of these options to suit you.
|
|
|
Receipt Invoice Printing
This option group controls the printing or emailing of Invoices in addition to the POS receipt.
If you wish to print an invoice for a POS transaction in addition to the POS receipt, you must check the Print Receipt Invoice box at the bottom of this form. Check the additional box to add comment print to this function. If the Print Receipt Invoice box is checked here you will see the Invoices box in the POS transaction process, giving you the option to print or not print a receipt invoice for this transaction. These functions are also available for Estimates if checked here.
|
|
![]() Long Topic; More Information Below....
Long Topic; More Information Below....
![]()
![]()
|
Basic System/Sales Options
Use Touch Screen/Allow Keypad Access Panel: Click these options if you are using a Touch Screen or Keypad input devices to use ReSource software.
|
|
|
Item Selection Default
This preference section sets the way that you want the system to lookup list items at the Point Of Sale (POS).
Of course, you can over-ride these settings at any time by clicking on the lookup screen buttons.
|
|
|
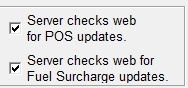
Update Preferences
The ReSource PartnerTM software is capable of auto updating itself with the latest program updates , as well as automatically updating your carrier fuel surcharges costs .
For more information, look in the index for UPDATES and FUEL
|
|
|
Other Options
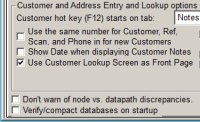
Customer Hot Key Starts: Sets what Customer database tab you wish to open when using the F12 Hot Key
Date Format: Controls the default date format used by the system. This should be set to MM/ DD/ YYYY for all locations in North America
Don't Warn Of Node Vs. Datapath Discrepancies: Please leave this unchecked
Use The Same Number For Customer: If this is checked the number entered in the Reference field will automatically be applied to the other fields listed. if unchecked, the program will not assume an entry for the fields listed.
Show Date When Displaying Customer Notes: Date stamps Customer Notes.
Use Customer Lookup Screen As Front Page: You can set the system to automatically open Customer Lookup at the end of each transaction. This is done so that the customer window is already available to start a new transaction.
Default Address To Residential: When checked, this sets the Default in the Address Entry form to have the Residential box checked. When unchecked, the Residential box will be unchecked by default.
Verify/Compact Databases On Startup: This option is an added step to catch data corruption as early as possible. It should be noted that checking this box adds time to the startup when you open the program. When unchecked, it omits this steps in the startup software loading process.
Show Notifications On Main Screen: Enables the Notification Window on the Main Screen so that you can receive news and other information from ReSource. For more information, see the Notification Window topic.
|
|

 SEE ALSO: Credit Card Processing Overview

If you use an external machine, you can also set these options to control how much information is captured for sales reporting purposes only.
|
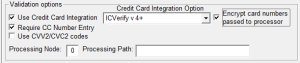
Validation Options - Using IC Verify Software
These options control how the system validates credit card transactions. ReSource directly integrates with the IC Verify software product to automate the credit card approval process.
Use Credit Card Integration: Check this option if you are using ICVerify software for credit card validation. When this option is checked, you will then be provided with a menu where you will select your credit card processing software and version. "IC Verify 4+" is most common.
Require CC Number Entry: When checked, the Credit Card entry section of the form is displayed. All credit card numbers will be listed on the Z-Tape. Sales will be subtotaled by type of card used. When unchecked, the Credit Card entry section of the form is not displayed. All credit card numbers will be listed as 01010101010 etc. on the Z-Tape. The type of card used will not be recorded by the program. This option can be used, even if integration option is unchecked
Use CVV2/CVC2 Codes: When checked, the prompt for the additional three digit field many processors are requiring will be displayed for manual entry of this security number. if unchecked, the prompt will not be displayed.
Processing Node / Processing Path: This information is usually not needed. Do not configure unless directed by ReSource Customer Service
Credit Card Integration Options: Specifies the version of IC Verify in use, as well as the processor type.
Credit Card Signature Receipt: Default is to print one. This allows folks to turn it off if a Genius or similar device captures signatures. Check box is in Store Information – (tab) General – (sub-tab) Credit Card Options.
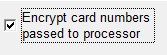
Encrypt Card Numbers Passed To Processor: Encrypts the data stream between ReSource and credit card processing platform. Only needed for IC Verify versions 4.04 and higher.
|
|
|
Validation Options - Merchant Warehouse Genius Options
More information on obtaining and configuring the Genius Device necessary to use these processes can be obtained by contacting ReSource Sales (800)818-0492
|
|
![]() NEXT: Set General Receipt & Other Preferences
NEXT: Set General Receipt & Other Preferences
![]() SEE ALSO: Credit Card Processing
SEE ALSO: Credit Card Processing
Return To Configuration Overview
![]()
ReSource Help System - Home Page
![]() Sales: (800) 818-0492
Sales: (800) 818-0492
Customer Service: (800) 537-3621
Email: support@resourcesoftware.com | sales@resourcesoftware.com


Follow us @resourcehelp | Subscribe To ReSource Software YouTube Channel
ReSource Partner Help System. ©1996-2014, ReSource Inc. All rights reserved.
ReSource Inc., 10465 Park Meadows Drive Suite 205, Littleton, CO 80124
Terms Of Use | Legal | About
ReSource Partner, Partner Express, QuickMail, and WebAssist are trade names of ReSource, Inc.
All other trade names mentioned are property of their respective owners.
POS SHP MBX | PK | US
14.2.2 | 14.1.1