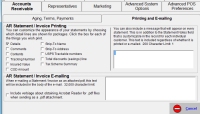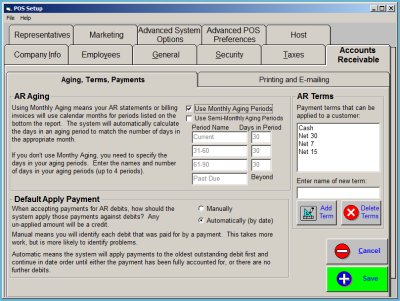
This is the Accounts Receivable tab. This screen is where you setup the way you wish to manage your on-account customers. On account printing preferences are also managed from this tab
This form allows you to enter the terms and aging periods you wish to use for your Accounts Receivable. Terms are printed in the upper right-hand corner of the statement. Aging periods are used for the Account Aging Report, and dollars owed are reported by period at the bottom of the Statement.
|
AR Aging
In this area you can manage the aging periods for your Accounts Receivable statements. You have these choices
If you want to your store credit information to be reported by calendar months rather than by defined reporting periods, click in the Use Monthly Aging Periods box. If checked this setting overrides any defined terms displayed. To age using a 15 day aging period, check Use Semi-Monthly Aging. . Selecting this one is similar to using Monthly Aging, just each month is split into two periods: the 1st – 15th and the 16th – end-of-month.
|
|
|
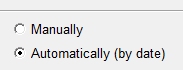
Default Apply Payment
This selection gives you the ability to set a Default Payment method for posting AR payments.
You have two choices here:
|
|
|
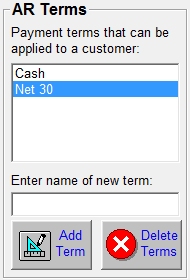
AR Terms
This area is where the payment terms are defined. When you setup an on account customer, you use these definitions to assign the customer terms in the Customer Database | Accounts Receivable tab.
These terms also appear on the customer's monthly statements.
By default, two terms are predefined; Cash and Net 30. You can add any other terms you wish by typing the name of the Term, then clicking Add Term. You can delete an existing term by clicking on the Term, then clicking on the Delete Term button.
|
|
![]() Long Topic; More Information Below....
Long Topic; More Information Below....
![]()
|
Statement Print Details
In this area, you can choose to add details to your statements when they print, and what details to add. To add detail to the statement, check the desired boxes for the detail you want.
The Tax Scheme Summary check box allows you to summarize taxes paid by tax scheme for your customers for situations where multiple tax jurisdictions apply.
If you wish to enable prompting for Purchase Order Numbers, that can be printed as part of these details, please review the General Tab | Advanced Receipt Options topic.
|
|
|
Statement General Message
If you wish to add a message which will print on all statements or invoices, type your message in the box at the bottom center of this form. This option applies to all statements.
|
|
|
AR Statement/Invoice Emailing
This adds a statement to an emailed Statement or Invoice notifying the user that the attached information requires the Adobe Acrobat Reader, along with an option to add a download link to the email telling the user where they can download this program.
|
|
Return To Configuration Overview
![]()
ReSource Help System - Home Page
![]() Sales: (800) 818-0492
Sales: (800) 818-0492
Customer Service: (800) 537-3621
Email: support@resourcesoftware.com | sales@resourcesoftware.com


Follow us @resourcehelp | Subscribe To ReSource Software YouTube Channel
ReSource Partner Help System. ©1996-2014, ReSource Inc. All rights reserved.
ReSource Inc., 10465 Park Meadows Drive Suite 205, Littleton, CO 80124
Terms Of Use | Legal | About
ReSource Partner, Partner Express, QuickMail, and WebAssist are trade names of ReSource, Inc.
All other trade names mentioned are property of their respective owners.
POS SHP MBX | PK | US
14.2.2 | 14.1.1