Lookup Screens in ReSource Partner allow you to quickly sort your database information into one searchable screen. Two examples are shown above; Customer Lookup and Inventory Lookup. While the information contained in these screens are different, all lookup functions in ReSource utilize the same lookup frame. Shown below is a guide.
You can pick a default way you lookup items most of the time. For example, if you usually lookup by typing the item description, having that set as your default will save you some steps.
Instead of having two entry boxes, one for typing stock numbers and scanning bar codes, and one for typing descriptions, there is a single box for all entries. Whichever method you set as your default will have the corresponding button highlighted. The program is ready to lookup items based on that default selection.
If you do not wish to use the default entry method, simply click the button to change methods, or use the keyboard shortcuts. / for Stock Number, + for Description, or * for Scan. If you have a scanner that has been programmed to work with earlier versions of the program by adding an * character, the program will automatically switch to Scan mode. No reprogramming is required. However, the * character is no longer required. If you wish to change the scanner programming to work more seamlessly with other applications by removing the * character, it will still work in ReSource if Scan mode is selected.
Clicking the Search button filters on just what you typed in the top search field. Example: pick Last Name and type gib then click search. In the past, the system would find a customer named Gibbs and the filtered list would only show customer with a last name of Gibbs. Now, the filtered list would include a customer whose last name is, say, Gibson. If you type GIB then click on Gibson, then click Search, only customers with a last name of Gibson will be in the filtered list.
|
Lookup Screen Search Preference Buttons
All lookup screens in ReSource Partner allow you to set the way you want these screens to operate.
|
|
|
Inventory Item Lookup Buttons
This preference, located at FILE | Program Setup | Store Information | General Tab , Miscellaneous Options, allows users to set the way they lookup inventory item most often. Whatever button is selected will be the choice the software will assume. Of course, you can override the choice by clicking any of these buttons during a transaction.
|
|
|
Search Priority Buttons
The buttons along the top of the Lookup window allow you to choose what piece of information you wish to search. When you click on a button, it will group the list by the column selected. For instance, if you are looking for a company name, click the Company column header. It will highlight in yellow. Type the first few characters of what you are searching for. ReSource Partner will search down to the matching records that contain those letters.
|
|
|
Date Selection/Filter Menus
On some screens you can expand or limit the date range for which items are displayed.
In Receipt Lookup, by default the list shows the current month and the prior month.
To view additional time periods you have options to modify these limits
|
|
|
Lookup Menu
Each lookup screen has filters you can apply.
For instance, on the Customer Lookup screen, you can modify the listing by Address or Status.
Other lookup screens have similar choices
|
|
|
Lookup Buttons
At the bottom of lookup windows are additional control buttons
|
|
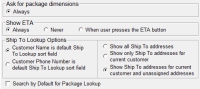
Some program areas allow you to filter the results shown in the lookup screen. As shown above, you can filter the number of receipts displayed in Receipt Lookup. Another example is the display of Shipping Addresses. The Ship To Lookup screen has the option to pre-filter the address list to speed up your searches. These preferences are set via the Shipping Setup, Process Options tab.
Here are some ways you can control what data is displayed when you use a lookup screen.
|
Use Same Number For Customer, Reference, Scan, And Phone In Customer Database: This is set at FILE | Program Setup | Store Information | General, Miscellaneous Options. Check this option to use the same number to lookup customers at all lookup screens
If this is checked the number entered in the Reference field will automatically be applied to the other fields listed. if unchecked, the program will not assume an entry for the fields listed.
|
|
|
Item Selection Default: This preference, located at FILE | Program Setup | Store Information | General, Miscellaneous Options, allows users to set the way they lookup inventory item most often. Whatever is selected will be the choice the software will assume you wish to start with.
|
|
|
Use Customer Lookup As Front Page: You can set the POS system to automatically open Customer Lookup at the end of each transaction. This is done so that the customer window is already available to start a new transaction.
|
|
|
Shipping Address Lookup Filtering: You can set a filter on which Shipping Addresses are displayed, and how they are displayed.
See the Ship To Lookup and Process Options topics for more information about this.
|
|
![]() SEE ALSO: Customer Lookup Features At POS
SEE ALSO: Customer Lookup Features At POS
![]() SEE ALSO: Managing Customer Database From Shipping Screen
SEE ALSO: Managing Customer Database From Shipping Screen
Return To Configuration Overview...
![]()
ReSource Help System - Home Page
![]() Sales: (800) 818-0492
Sales: (800) 818-0492
Customer Service: (800) 537-3621
Email: support@resourcesoftware.com | sales@resourcesoftware.com


Follow us @resourcehelp | Subscribe To ReSource Software YouTube Channel
ReSource Partner Help System. ©1996-2014, ReSource Inc. All rights reserved.
ReSource Inc., 10465 Park Meadows Drive Suite 205, Littleton, CO 80124
Terms Of Use | Legal | About
ReSource Partner, Partner Express, QuickMail, and WebAssist are trade names of ReSource, Inc.
All other trade names mentioned are property of their respective owners.
POS SHP MBX | PK | US
14.2.2 | 14.1.1