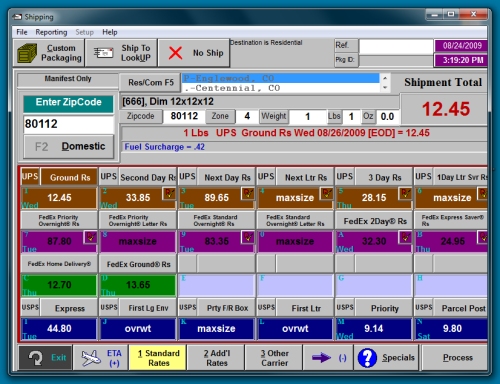
The Shipping Screen (some folks call it the rate shopper screen) allows you to rate a package and choose the best shipping scenario for you and your customer. At a glance, all of the possible shipping choices are presented to you on one screen. You click on the Carrier and Service that best suits you. The information on the screen changes "on-the-fly" based on your choices.
This screen may look slightly different in your version. The functions and fields will basically stay the same.
Shown below is an extensive list of the various buttons and fields on the shipping screen. This is a long topic so please continue to scroll down.
|
Custom Packaging:
Opens the Customer Packaging Estimator module. This allows you to estimate the cost of packaging materials prior to shipping. For more information, view the Custom Packaging Estimator topic.
|
|
|
Ship To Lookup:
Click the button at the beginning of the shipment to pick an existing address, or to create a new address. You will usually click this button, or Custom Packaging, to start a shipment. For more information, view the Ship To Lookup topic.
|
|
|
No Ship Button:
This button does what it says, it does not ship the package. It is designed for situations where you want a price to come back to the POS for charges , but you do not want a shipping label generated. You can click on this button at any point after you enter weight and dimensions.
|
|
|
Reference/ Package ID:
Ref Pkg ID fields display the Reference Number and/or Package ID assigned.
|
|
|
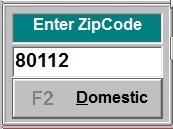
ZIP Code Entry Box:
This is where you will enter the shipping destination ZIP Code. Entry into this field then is used to determine zoning and service availability.
If you select a If you click the "Domestic" button below, this will change into the Country field, for entering International shipments.
|
|
|
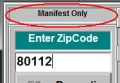
Manifest Only Warning:
Manifest Mode Only mode allows you to create shipments, without corresponding charges being returned to the Point Of Sale Screen. When Manifest Only mode is selected, all filtering is removed, and Manifest Only warning appears above the ZIP Code box.
You can see that the Shipping Screen is in Manifest Mode only by looking above the ZIP Code entry box.
|
|
|
Domestic/International Button:
Clicking this button will change the ZIP Code field, above, into the Country field, for International shipments.
|
|
|
Res/ Com Button:
This button will let you switch between Residential and Commercial settings, thereby adjusting the rate charged.
|
|
|
Alternate City Name Listing:
Displays the zip code database table, which verifies the city and state . The P indicates this is primary service area. The letter A indicates an alternate city served by that zip .
Some ZIP code ranges have alternate city names which can be used. After entering the code, you can select an alternative city name only before the weight/dimensions are entered. Once that information is entered, this field is locked to prevent service availability errors.
|
|
|
Cost Brackets:
The number shown in the brackets is the total cost for the shipment, including specials and surcharges, less any tier discount entered in Shipping Setup. It is formatted in this way so you can see on-the-fly what your total cost is for this shipment. The cost shown is for the service currently selected on the shipping screen. This section is useful so you always know what your costs are as you negotiate with customers.
|
|
|
ZIP Code/Zone Box:
Displays the ZIP code and zone on which the shipment quote is based
|
|
|
Weight Boxes:
This displays the weight of package, broken down by pounds and ounces. You can enter the weight in ounces in decimal form here as well.
|
|
|
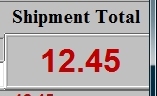
Shipment Total:
This is the total of all charges for the selected service. Left click on this number to see a break-out of the component retail charges (Base Rate + Fuel + etc.).
|
|
|
Service And Charge Box:
Displays the service and charge for the selected shipment. The ETA day and time commitment for the service is also displayed if known. In the example shown here, EOD is displayed for End Of Day time commitment to this ZIP code. Had a time commitment for this destination been available, it would have been shown (i.e. 10:30 for not later than 10:30 delivery).
|
|
|
Accessorials (Specials) Box:
Displays the surcharges both automatically and manually added to this shipment. These would include Fuel Surcharges, Rural Surcharges, and Declared Value, among others.
|
|
|
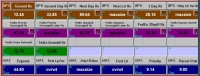
Carrier Selection Area:
This is where you will choose the shipping service to use. The carriers are listed to the left, and the services they offer are in the rows to the right of them. Beneath each field you will find the cost to ship using that service, and if you have activated it, an ETA will be displayed. If the size or weight of the box is beyond the limits set by the carrier for that service, that will also be indicated in this area. You can choose more services by click the right arrow, in the bottom left corner. You can also choose more carriers by clicking the Add'l Rates button below.
|
|
|
|
|
|
Exit Button:
This will exit the shipping screen, without processing the current shipment.
For versions with Point of Sale functions, when a shipment with Custom Packaging is canceled you will be prompted to ask if the packaging charges should be posted to POS .
|
|
|
ETA Button:
This will display the day of arrival according to carrier and destination ZIP Pcode. |
|
|
Standard Rates\Additional Rates Buttons:
Displays the retail rates for the first four Carriers listed.
ReSource supports four rows of rates on the first screen, and four rows of rates on the Add'l Rates screen. With Carriers introducing more services, there simply is not room to list them all on the first screen. Our recommendation is that you display your most common services on the Standard Rates screen and the more specialized/uncommon services on your Additional Rates screen.
|
|
|
Other Carrier Button:
This is for processing shipments through a third-party shipper, such as a local LTL carrier. For more information, review the Other Carrier topic.
|
|
|
Row Extension Arrow (More Services Button):
The Row Extension Arrow takes this another step further. On each row, of each screen, there are seven cells per row. Clicking the Row Extension Arrow extends the row out another 7 cells.
|
|
|
Specials:
Specials ( accessorials) are additional services added to the base shipping charge. You add these services by clicking the Specials button, then selecting the services.
|
|
|
Process Button:
The process button is where you make everything happen.
The process button completes the shipping process, calculating and processing the shipment by placing it on the manifest, issues appropriate labels, and transfers the sale to the point of sale screen.
The system will process the shipment, produce a label, then print a confirmation receipt , then return the charges back to the Point Of Sale for completion .
|
|
![]()
 ReSource Help System - Home Page
![]() Sales: (800)818-0492
Sales: (800)818-0492
New POS Hardware/Printers/Systems
ReSource/PC Synergy Software Support: (800) 485-6901 - Option 1
ReSource Partner Help System. ©ReSource Inc. All rights reserved.
ReSource Inc., Denver, CO 80112
Terms Of Use | Legal | About
ReSource Partner, Partner Express, QuickMail, and WebAssist are trade names of ReSource, Inc.
All other trade names mentioned are property of their respective owners.
POS SHP MBX | PN | US
15.0.1 | 15.0.1