
If you use a third-provider for your package coverage (i.e. purchasing coverage from a company other than the carrier), you will need to configure Alternate Declared Value setup (ADV).
You will use the cost and limit parameters given to you in the coverage policy to perform this setup, then assign carriers and services to this provider. Finally, you will configure a retail price for this coverage.
If you are a franchise store, this section is preset to the service provider recommended by your franchisor. If you are part of an organization that has its own ADV program, that program is also preset for you. Regardless, you will want to review the retail pricing for each insurance category.
There are three areas that must be setup for ADV to operate at the Special screen in Shipping:
Provider Setup - Company Name and address information
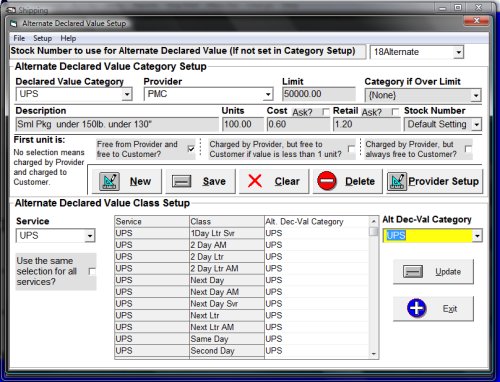
Alternate Declared Value Category Setup - Enter categories of insurance offered by the provider
Alternate Declared Value Class Setup - Identify the insurance category to be used by carrier by each class of shipment
![]() Alternate Declared Value (or ADV) is the preferred term for package damage coverage, instead of Insurance
Alternate Declared Value (or ADV) is the preferred term for package damage coverage, instead of Insurance
At the Alternate Declared Value Setup screen, click on the Provider Setup Button on the right-hand side of the form
Enter the requested information for your third party insurance provider, as it is to appear on the monthly or weekly report you are to submit to your provider for coverage
Click on the Save button
Click on the Done button to exit this function
You have the option to assign your Alternate Declared Value sales report to POS one of three ways:
a) Included in Freight – this option will have the insurance charge report to the carrier sales category
b) Assign it to a sales category you have entered in the inventory database.
c) Assign each insurance category to report under the sales category as an item
To assign Alternate Declared Value using option b or c at Stock Number to use for Alternate Declared Value, click on the down arrow and select the correct option from the list. If you are using option a, leave this option set to Included in Freight. You will make your entry in Setting up an Insurance Category.
At the Alternate Declared Value screen, click on the New button on the far left-hand side of the form. The cursor will be positioned in the Insurance Category field.
Insurance Category – Enter the Category name used by your provider for a level of coverage (limit 18 characters). Press the Tab key to move through the fields on this form.
Description - This field allows for a more detail description of the insurance category being entered. Press the Tab key
Provider - Click on the down arrow in the Provider box. Highlight and click on the appropriate provider for this Insurance Category. Press the Tab key
Limit - Enter the maximum dollar amount to be insured for this category. Press the Tab key
Category If Over Limit – If the insured amount is over the limit, you may designate a separate category. Use this option if you have a different pricing structure for high value items. Press the Tab key
Enter the dollar amount of a unit. E.g. Insurance is usually paid on valuations in $100.00 increments. Press the Tab key
Cost – The ”r;Ask?” check box means the system will ask you to enter the total for insurance premium and how much you wish to charge for retail for each shipment in this alt-ins category. This option is used for categories where you are required to contact the provider for very high valued items and obtain a specific quote for insuring that item. Press the Tab key
Cost - Enter cost per unit in field below (i.e. your premium per unit). Press the Tab key.
Retail? – This field is used if Ask is not checked. Enter your retail charge per unit in the field below Press the Tab key
If you are reporting Alternate Declared Value by insurance category, click on the down arrow and select the correct stock number for this insurance category.
First Unit Is?
No Box Checked - Both the store and the customer pay from the first dollar for all units.
Free From Provider Box Checked = No charge to store or customer for the first unit of $100. Both will be charged for each additional unit.
Charged by Provider but free to Customer if value is less than 1 unit = first $100 is free to the customer. At $101 store pays for an additional unit but the customer pays for 2 units.
Charged by Provider, but always free to Customer – the store pays from the first dollar of value for all units but the customer gets the first unit free
Click on the Save button to complete the setup for this category
Repeat from step 1 until you have defined all the categories used by your store
Click on the down arrow in the Service box on the left-hand side of the form
International carrier classes are designated with I. The OTHR and OTHRI classes should not be assigned.
Highlight and click on the carrier you are going to assign
Click on the down arrow in the Alternate Declared Value Category box
Highlight and click on the appropriate Insurance Category for this carrier
Click on the box on the left-hand side to assign this Insurance Category to all classes of shipment for this carrier.
Note: The description area must be yellow for your selection to be effective. If it is not yellow, uncheck and recheck the box.
If the same category is not applicable to all classes of shipment by the carrier, to assign each class individually, select the desired Alt Dec Value category. Double click on the Alternate Declared Value Category box for that class of shipment. The designation in the Alternate Declared Value Category box will change to reflect the new selection.
Click on the Update button
When you have finished Alternate Declared Value Setup, click on the Exit button.
You will be required to file a premium payment report with your Provider periodically. Contact your provider to determine how often you must file a report.
To generate this report, from the Shipping screen, do the following:
Click Reporting
Click Reports
Set the Alternate Declared Value
Set the Record Selection to ALL (unless you are using multiple providers, then chose the desired provider).
Set the date range to the premium reporting period you need.
Click Launch.

SEE ALSO: Assign Insurance Revenue To Inventory
![]()
ReSource Help System - Home Page
![]() Sales: (800) 818-0492
Sales: (800) 818-0492
Customer Service: (800) 537-3621
Email: support@resourcesoftware.com | sales@resourcesoftware.com


Follow us @resourcehelp | Subscribe To ReSource Software YouTube Channel
ReSource Partner Help System. ©1996-2014, ReSource Inc. All rights reserved.
ReSource Inc., 10465 Park Meadows Drive Suite 205, Littleton, CO 80124
Terms Of Use | Legal | About
ReSource Partner, Partner Express, QuickMail, and WebAssist are trade names of ReSource, Inc.
All other trade names mentioned are property of their respective owners.
POS SHP MBX | PK | US
14.2.2 | 14.1.1